As a Social Media influencer, the digital world gives you untold opportunities to grow a business – and earn a living – around the most valuable commodity: your own personality!
In this guide, we give you everything you need to build a print-on-demand merchandising business that capitalises on your brand – driving revenue and creating an amazing line of merchandise products for your fans.
Best of all, it takes minimal effort, no upfront investment and almost no ongoing legwork.
This guide takes you from the very beginning of the process, setting up your store, right through to marketing and promotion.
It covers:
- How to create your Shopify store.
- Where to source amazing designs that you can sell on merchandise.
- How to set up the Kite integration to create a print-on-demand product range in minutes.
- How to customise your products and logo placements to show off your brand in all its glory.
- How to design your store for consistency with all your other online channels.
- How to market your store to your audience for maximum impact.
NOTE: the page is very long – with plenty of images: please be patient if you’re finding it taking a while to load fully!
If you would prefer to view this guide as a downloadable PDF click here:
What is Print-on-Demand Merchandise?
First, let’s explain exactly how print-on-demand merchandise works, and how it differs from traditional merchandising.
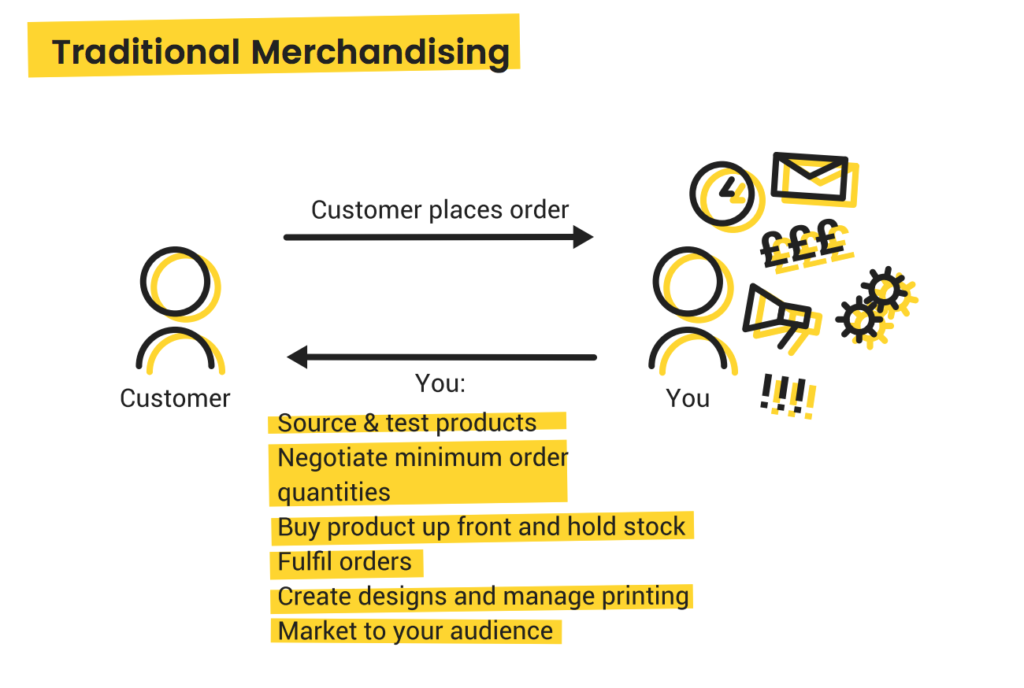
Brands and personalities have been selling merchandise for decades. Using the traditional model, you’d have to source and test your own products; negotiate minimum order quantities; buy product up front, and hold your own stock (in the hope that it sells!) You’d also need to manage your own order fulfilment process.
This is a really time-consuming and difficult process; not only does it take a lot of work to get up and running, you’re also committed to a great deal of ongoing effort. Every time a customer places an order, you’re in sole charge of making sure that order is fulfilled.
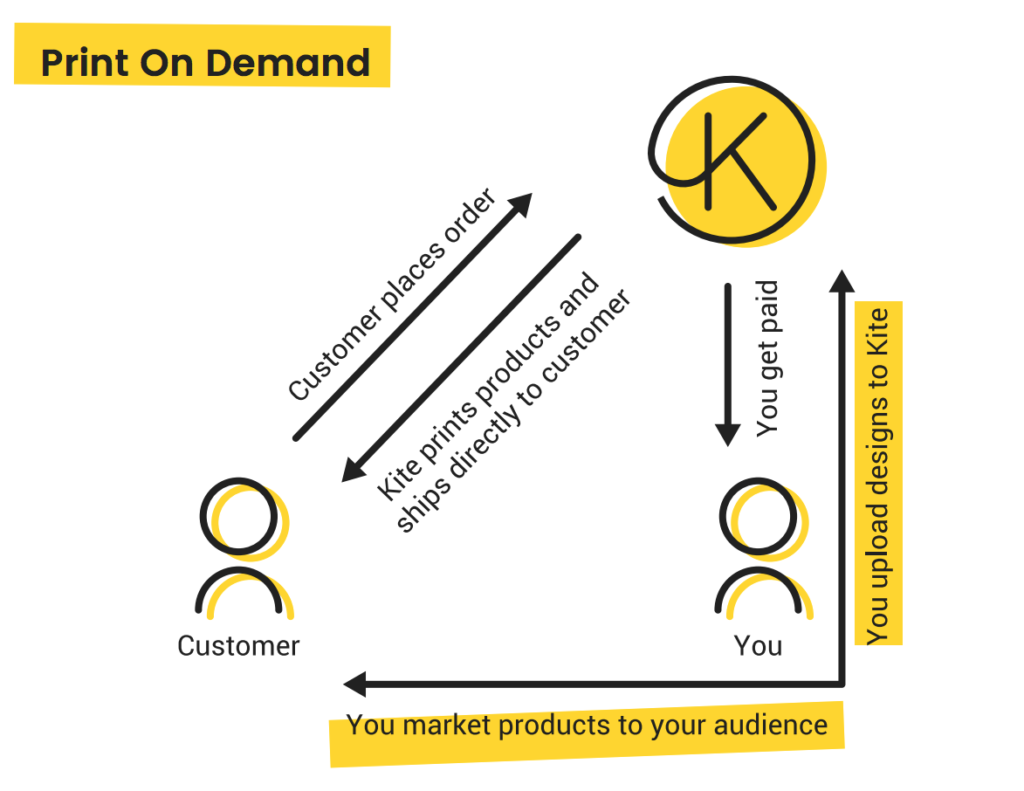
Print-on-Demand is a game-changer. Essentially, it means the vast majority of the ‘boring’ work is done for you. You can build your store and add products incredibly quickly. Then, when your customers start placing orders, that third-party, print-on-demand partner, will process, print and dispatch the order without any input whatsoever from you.
Essentially, you’re in charge of creating and uploading your designs, marketing your products – and that’s it.
What you’ll need…
To get up and running with Kite, you’ll need:
- A Shopify store account.
- The “Kite – Print on Demand” Shopify Merch Plugin. This is free from the Shopify App Store.
- At least one design or slogan you’ve either created yourself, or have permission to use on your own merchandise.
Sourcing Your Design
Your merchandise is, literally, a blank canvas – the value is really added by your design. The design is what takes a plain, uninspiring garment and turns it into something your audience must have.
In this section, we’ll give you some ideas to help source great designs.
Hire a graphic design freelancer
Often the most obvious starting point is to bring in a professional designer. They’ll be able to provide quality designs in the formats you need for your store.
Sites like Upwork and Peopleperhour offer huge networks of freelance creatives. You can browse and filter them by price and experience – and you should definitely make sure to check out their prior work to make sure they’re a good fit for you.
They’ll probably ask for a little information about you and your brand before getting to work. In terms of what designs you should use, think about the content you create that performs best; is there anything that drives really good engagement figures? Anything you hear repeatedly being quoted by your fans? If you’re really unsure, ask them. You can run free, easy-to-build surveys through SurveyMonkey that can drive amazing insights about who your fans are, what they like about you, and what it is about you and your content that resonates with them.
Run a design contest
If you’d rather not limit yourself to one particular freelancer, why not consider running a contest? Using this model of design work, you fill out a brief with some information about your requirements, and any creatives who want to get involved can submit their designs for your consideration. You simply pay for your favourite one.
99 Designs and Crowdspring are two platforms you can do this through.
Get hundreds of slogan ideas with Shopify’s ‘Free slogan maker.’
If you’re struggling for inspiration, this tool can be a great starting point. You enter a keyword relevant to you, your channel or online profile, and the system generates thousands of different suggestions for slogans. Sure, they’re not all winners, but they may just spark your imagination and give you a point to work from.

Stock illustrations
This option isn’t always ideal – stock illustrations are, by their very nature, available to anyone who wants to buy them, and it’s really better to have something unique to you.
But as a starting point, to fuel your imagination, experiment with how Shopify works, or if you just don’t have time to wait for a freelancer to do their stuff, this isn’t a bad place to look.
Head to shutterstock.com/vectors and either explore the various categories, or search for a keyword if you have something in mind. Important: whichever vector image you choose, make sure you purchase a suitable license that gives you permission to sell the design on apparel.
Another great resource for free images is Unsplash and the recently launched PNGTREE.

For more on sourcing ideas for merchandise click here.
Setting up your Shopify Store
Setting up an account on Shopify is quick and easy. And if you just want to see how it all works, with no obligation, you’re in luck – you can try it, free for 14 days, with no obligation and no credit card details required.
1. Visit Shopify.com. Enter your email address, and click ‘Get Started.’

2. Choose a password, and name your store. (You can change this later on so don’t worry about it too much!)

3. Sit tight while your store’s created.

4. Provide a bit of information about your previous selling experience. This helps Shopify provide you with the most helpful and relevant information to get you started!


5. Add your address and then click ‘Enter your Store.’

That’s it – for now, you’re all set, although we’ll be coming back and working further on Shopify later to manage some important details of our store, including payments, shipping and design theme.
Adding and setting up the Kite Shopify Merch integration
Once you’ve set up your Shopify account, it’s time to add and set up the Kite plugin. This beautiful little integration lets you set up your store – and all your products – in a matter of minutes!
1. Go to https://apps.shopify.com. Search for the Kite app, and click ‘Get’ to install it.


Uploading Your Designs
Upload your first design by dragging and dropping it into the box shown, or clicking the ‘Add Images’ button. Images can be uploaded in TIFF, JPEG or PNG format.

It’s important to note that each product has an optimal image size (see the chart below.) However, for now, just upload your image in the highest resolution you have it.

Click ‘Next’ when you’re ready.
Product Selection
Each design that you upload to Kite is classified as a Shopify ‘collection.’ We now need to decide which products we’ll be selling with each design. Click one of your designs to view the product range and get started.

Clicking the pencil icon next to ‘Untitled Range’ will allow you to name your collection.

So, which products to sell? Well, each product has a little slider in the bottom corner that allows you to enable or disable it in your store.


You can use the filtering option to take you right to particular product categories.

Product Customisation
Click on a product to customise it. Here, you can preview the design on different product variations. For example, different garment colours…


Different models of phone cases…

And different product size options…

Just as you did when deciding which products to include on your store, you can also enable and disable different variations. Just select the ‘Details’ tab from the left navigation menu (the third icon down) and then tick/untick the options you’d like to offer, under ‘Variants.’

You can also edit the size and position of the design on your product, using a simple drag WYSIWYG editor.


IMPORTANT: Don’t forget to hit ‘CONFIRM CHANGES’ when you’re done editing your products!
Product Pricing
Now, let’s decide how much markup to charge on the sale of each product. The retail price and profit are automatically calculated for your convenience, so you know how much you’ll make from each sale – and how much your customers will pay.

For more details on pricing and commission please click here
Shipping
It’s important to spend a little time reviewing the ‘Shipping Options’ area of your product editing page. The drop-down menu here lets you check out the options – and costs – for shipping orders to various parts of the world.

A NOTE ABOUT SHIPPING FEES
The cost of shipping isn’t added to your customers’ order total when they buy.
You define how much your customers pay for shipping via the ‘Settings & Shipping’ area of your Shopify account.
There are two ways of making sure your shipping costs are covered and your margins preserved.
One is Calculated Shipping. Using this Shopify feature, when customers checkout from your store, they see accurate shipping rates based on order weight, package dimensions, and shipping destination. The best rate is determined and displayed for them, minimising the risk of customer drop-out.
The other is offering Free Shipping and ensuring your profit margins swallow up the loss you take on shipping. Shipping costs are pretty unpopular among customers, and Shopify themselves write, “Having to pay extra shipping and handling fees is one of the main reasons why customers will abandon their shopping carts. You can encourage your customers to complete their purchases by offering free shipping options at checkout.”
Shopify lets you set Free Shipping rules when the customer spends a certain price amount, or the package is a certain weight.
Choose whichever option works best for you – but make sure not to simply forget about shipping costs altogether, as this can really hurt your margin if you neglect it!


ABANDONED CART EMAILS
One of the most frustrating aspects of selling online is cart abandonment. This is where your customer adds products to their basket, but doesn’t complete their purchase.
There are dozens of reasons why customers do this – from unexpected shipping costs, to long checkout processes, to simply running out of time.
Whatever the reason, abandoned cart emails are a really good way to bring these customers back to your store and nudge them towards finalising the purchase.
You can review your abandoned checkouts by heading to Orders > Abandoned Checkouts. This may help you identify patterns that suggest why your customers aren’t completing. From here you can manually send an email, with a link to their abandoned cart, and a message that invites them to head back and complete their purchase.
For you, the time-poor creator – busy with creating the content that keeps growing your profile – you can also set up automatic abandoned checkout emails. Start by heading to Settings > Checkout. In the Order processing sections, there’s a field marked ‘If the customer abandons their checkout heading.’ Here, you can select the number of hours that Shopify should wait before sending an abandoned checkout email. It defaults to ‘Never,’ but you can choose 1 hour later, 6 hours later, 10 hours later, or 24 hours later.
Don’t forget to click ‘Save’ when you’re done!
Going Live
When you ‘Enable’ a product using the little slider, that product is automatically pushed to your store.
So, if we preview our store now, we can see the products we’ve selected are now there. The store looks basic and needs a lick of paint, but we’ll sort that out shortly!
Payments
The way Kite works is that you take full payment for your orders – and we invoice you separately for the wholesale cost of the product, plus shipping.
This means, before you can start selling in earnest, you need to:
- be able to accept payments through Shopify
- set up your billing information so we can invoice you.
Let’s cover those one at a time. To set up payments, head to Settings > Payment Providers.

Most people choose Shopify Payments (with rates of 2.2% + 20p on each transaction.) But if you’re not using Shopify Payments, and you want to accept credit cards, you can choose from over 70 credit card payment providers for your Shopify store. You can find out more here.
Choosing a Store Theme
Shopify is super-easy to customise so you can ensure that your store design matches your brand. This helps convey trustworthiness to your audience.
Head to ‘Online Store’ under Sales Channels and select ‘Themes.’

If you scroll down the page slightly, you’ll notice that there are a range of free themes to explore – as well as the Shopify Theme Store if you have a budget and you’re looking for something a little fancier.

To show you how it’s set up, let’s take a look at the Free themes and choose one that’s suitable – we’ll go for Supply.


Clicking our chosen style gives us a bunch of important information about that particular theme – like what design features are included. Once you’re happy with your theme, hit the ‘Add’ button in the bottom right. It takes a couple of seconds for the theme to be added.
Now we want to make the theme work for our store – so let’s hit ‘Customize Theme.’

This takes you to Shopify’s WYSIWYG theme editor which has two sections in the sidebar – ‘Sections’ and ‘Theme Settings.’

In Sections, you can jump around different parts of your store layout, editing text and images. You can delete sections you don’t want, and add your own messaging and imagery to the sections you do.


The ‘Theme Settings’ section lets you make much more sweeping changes – edit the colours, typography, cart page, social sharing settings, favicons and checkout area.


Matching up the colours of your theme is a great way to ensure you get consistency between your online store presence and your other digital channels.
Using a simple Chrome Extension like ColorZilla, you can ‘pick’ the colours from your website, and instantly copy the Hex code to your clipboard. You can then paste it into Shopify and ensure an exact match.


Success!
And just like that, you’re all done. Your Shopify store is created, your products are added, your designs are uploaded, your prices and shipping rates are set and you’re ready to accept orders and get paid! Of course, you can still come back and tweak parts of your store design and theme as and when required.
The next step is to get the word out about your store, and generate some orders…
Marketing and Promotion
The good news is, you have a great head start when it comes to promoting your new merch range. You’ve already built that committed audience who are interested in what you have to say. So let’s start with the low-hanging fruit…
1. Use your existing channels
Let’s start where that audience lives! Whether you’re active on Instagram, Twitter, Facebook, Snapchat or anywhere else for that matter – get the word out there first.
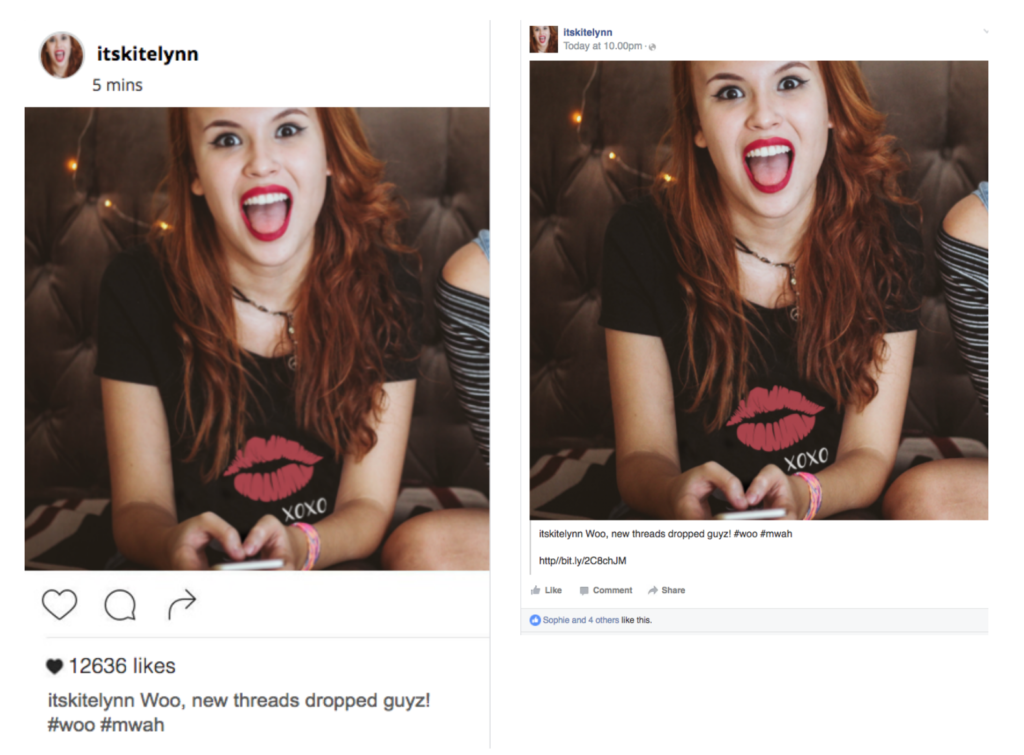
A great first step is to order some of the product for yourself. You can then snap some eye-catching photos of you modelling or using some of the products, telling your audience where they can get it for themselves.
NOTE: If unable to use the below examples, I suggest we create some assets in Illustrator here rather than screenshot a live Instagram post, which have the same sentiment but are clearly branded towards ‘Kitelynn.’
2. Add Facebook Shop
Facebook Shop is a must-have feature for print-on-demand merchandising. Not only does it open up a huuuuge audience of billions of Facebook users – it’s incredibly easy to setup and manage through Shopify.
First, head to ‘Apps’ from your left navigation menu and search for ‘Facebook,’ – a plugin created by Shopify. (The thumbnail image reads, ‘Shopify Facebook Shop.’)


Install the plugin, add your Facebook channel and connect it with your Facebook page. Once your products are reviewed and your shop is enabled, product details, images and inventory everything will sync automatically – and update as soon as you make updates in Shopify.
Top Tip is to double check and ensure that your collections are available to Facebook
To display a collection on your Facebook page’s Shop tab, you need to make it available to the Facebook sales channel:
- From your Shopify admin, go to Products > Collections.
- Click the name of the collection that you want to show on your Facebook Shop tab.
- On the Sales channels section of the collection page, click Manage.
- In the Manage sales channels availability dialog, check the box beside Facebook, then click Done.
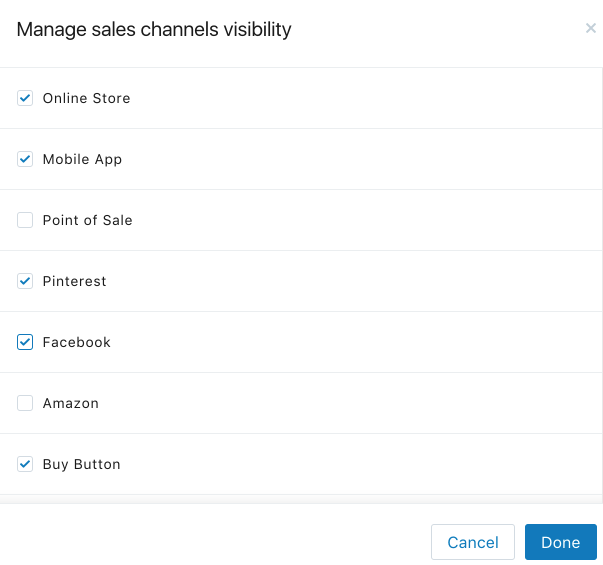
- Click Save to save your change to the collection.
If you’re having any difficulty with publishing your products to Facebook then click here:
In Facebook your ‘Shop’ option will be visible in the left hand navigation bar of your page, giving your products great visibility to the people who are most likely to buy.

3. Run a Shopify Store Blog
Blogging has two really positive effects; for one, it is a great way to communicate with your audience. It’s also a great way to strengthen your website domain and boost organic discovery of your products through search engines.
The good news is, Shopify has built-in blogging functionality. If you select ‘Blog Posts’ under ‘Online Store,’ then click ‘Create Blog Post,’ you can see a simple content management system where you can write and publish your content.
Posting this kind of content is a great way to divert your audience to your store site in a less promotional way.


4. Paid Advertising
We’ve already touched on posting organic social content. Unfortunately, it’s harder than ever to reach your followers with the average page reaching just 2% of its audience.
This is all part of the social channels increasing desire to monetise their platforms.
The good news is, advertising on social can be an incredibly productive tactic.
Facebook, in particular, offers a range of highly granular targeting options to help you not just ‘boost’ your posts to reach your existing audience, but to reach all sorts of people. You can reach people who have similar characteristics to your existing audiences; target people who’ve visited your website, or signed up to your email list. You can also, crucially, set up retargeting campaigns – this is where users who have visited your store site, or added your products to their cart and not completed, are followed up with adverts to entice them back.
Check out our “Facebook Marketing Guide for Custom Merchandise” for a comprehensive guide to Facebook ads.
5. Discounts and Offers
Shopify lets you quickly and easily set up offers – including percentage discounts, free shipping and fixed discounts – e.g. get £5 off when you spend £20 or more.
When you’re first launching a new store, or a new product range, why not set up some sort of launch discount to get the ball rolling? You could use a code like ‘LAUNCH10’ (as we have in the screenshot below) to promote the launch of your store to your followers, and give them an exclusive discount. You can create urgency by setting a start and end date to your promotion, and telling your audience they only have, say, 1 week to make a saving!

We can help!
If you followed the steps in this guide, you’re now up and running with your very own online store – and you may even have snagged your first order. Go you!
Of course, that’s just the beginning.
Here at Kite, we’re experts in print-on-demand merchandise – and we take pleasure in helping our partners succeed.
As you continue to grow your store and add to your product range, make sure to keep an eye on our blog, and get in touch with our amazing customer service team if you have any questions or suggestions.
